BLOG ブログ
さくらのクラウドでライブ配信サーバー構築方法

目次
ライブ配信サーバー構築のきっかけ
私がいつもホームページ運用のお手伝いをしているBAR RAINCOAT様は月に数回ライブイベントをしています。なかなか終息しないコロナの影響もあり、お客様も減っていて、RAINCOAT様も小規模ながらライブイベントはやっていますが、以前よりは集客しにくくなっているようです。
配信サービスのYouTube LIVEやFacebook LIVEなどは商用利用できなかったり、その他のサービスは高額だったりするので、小規模なライブには導入しにくい。それならばと、サーバーを自作して構築すれば費用も抑えられるし、来店できない方も家で観れるようになるし、RAINCOAT様やミュージシャンの方々の支援にもなるなぁと思ったことがきっかけです。閲覧制限も儲けたいので、WordPressも使用します。
私はエンジニアではありませんので、コマンドなどを扱うのはあまりなく、色々なサイトを参考にして構築しました。なので間違っていたり、構築環境も参考にしたサイトを真似て、バージョンなど、そのままインストールしたりしていますので、もしかすると最新バージョンでもできる場合がありまもしれません。また私の環境がWindowsとなります。その辺りはご了承ください。このサーバーを使用するのはもう少し先になりそうですので、備忘録として残しておきたいと思います。
構築環境
- さくらのクラウド
- CentOS 7.8
- Nginx 1.14.0
- RTMP
- php 7.4
- MariaDB
- WordPress
ドキュメントルート
- /usr/local/nginx/html
SSHでrootでログイン
コマンドプロンプト(Win)やターミナル(Mac)を開いてSSH接続し、rootでログインします。「xxx.xxx.xx.xx」はサーバーのIPアドレスです。
ssh root@xxx.xxx.xx.xxパスワードはさくらのクラウドで設定したものを入力します。
SSHでのログイン時に警告が出た時
さくらのクラウドのサーバーをやり直すために、削除したり、作成したりを繰り返すと下記のような警告が表示されます。私は何度か失敗したので、やり直してこの警告が出ました。
@@@@@@@@@@@@@@@@@@@@@@@@@@@@@@@@@@@@@@@@@@@@@@@@@@@@@@@@@@@
@    WARNING: REMOTE HOST IDENTIFICATION HAS CHANGED!     @
@@@@@@@@@@@@@@@@@@@@@@@@@@@@@@@@@@@@@@@@@@@@@@@@@@@@@@@@@@@
IT IS POSSIBLE THAT SOMEONE IS DOING SOMETHING NASTY!
Someone could be eavesdropping on you right now (man-in-the-middle attack)!
It is also possible that a host key has just been changed.
The fingerprint for the RSA key sent by the remote host is
**:**:**:**:**:**:**:**:**:**:**:**:**:**:**:**.
Please contact your system administrator.
Add correct host key in /Users/hoge/.ssh/known_hosts to get rid of this message.
Offending RSA key in /Users/hoge/.ssh/known_hosts:133
RSA host key for example.com has changed and you have requested strict checking.
Host key verification failed.
警告は「ssh-keygen」で削除したら対処できます。
ssh-keygen -R xxx.xxx.xx.xx(IPアドレス)出力例
# Host xxx.xxx.xx.xx found: line 4
/Users/arohajiro/.ssh/known_hosts updated.
Original contents retained as /Users/arohajiro/.ssh/known_hosts.old
もう一度rootでログイン
ssh root@xxx.xxx.xx.xxNginxのインストール・設定
Nginxをソースからインストールするために必要なツールを入れる。
sudo yum install wget gcc pcre-devel openssl openssl-devel epel-releasegitでRTMPモジュールをダウンロード。
git clone https://github.com/arut/nginx-rtmp-module.gitNginxをダウンロード
wget http://nginx.org/download/nginx-1.14.0.tar.gz
tar zxvf nginx-1.14.0.tar.gz
cd nginx-1.14.0/
Nginxをビルドする
./configure --sbin-path=/usr/sbin/nginx \
--conf-path=/etc/nginx/nginx.conf \
--error-log-path=/var/log/nginx/error.log \
--http-log-path=/var/log/nginx/access.log \
--pid-path=/var/run/nginx.pid \
--lock-path=/var/run/nginx.lock \
--prefix=/usr/local/nginx \
--user=nginx \
--group=nginx \
--with-http_ssl_module \
--with-http_realip_module \
--with-http_addition_module \
--with-http_sub_module \
--with-http_dav_module \
--with-http_flv_module \
--with-http_mp4_module \
--with-http_gzip_static_module \
--with-http_random_index_module \
--with-http_secure_link_module \
--with-http_stub_status_module \
--add-module=/root/nginx-rtmp-module
makeとインストール、Nginxユーザの追加
make
sudo make install
sudo groupadd nginx
sudo useradd -g nginx nginx
usermod -s /bin/false nginx
init scriptを作成する
vi /etc/init.d/nginx以下のURLの内容(グレーの枠内)を全てコピペする。
https://www.nginx.com/resources/wiki/start/topics/examples/redhatnginxinit/
viでファイルを開いた時、初期状態では「コマンドモード」になっています。これでは編集はできません。半角になっているか確認して「a」か「i」を打つと「入力モード」に切り替わって文字を打ったり消したりできるようになります。
コマンドモードに戻りたい時は「esc」を押します。
ファイルを上書き保存するコマンドが「:wq」
「esc」 → :wq
編集内容を破棄(保存しないで終了)するコマンドが「:q!」
「esc」 → :q!
何かミスって最初からやり直したいときに使います。
chmod 755 /etc/init.d/nginxRTMPの設定を追加
次に/etc/nginx/nginx.confにRTMPの設定を追加。
rtmp {
    server {
        listen 1935;
        chunk_size 4096;
        access_log /var/log/nginx/rtmp_access.log;
        application live01 {
            live on;
            wait_video on;
            record off;
            hls on;
            hls_path  /usr/local/nginx/html; ← nginxのデフォルト
            hls_fragment 5s;
        }
    }
}
hlsのパスは今回、nginxのデフォルトのHTTPサーバのディレクトリに設定しています。
設定が終わったらを起動
sudo /usr/sbin/nginx立ち上がっているか確認
ss -an | egrep '1935|80'Nginxを起動する
service nginx startポートの解放
firewall-cmd --zone=public --add-port=80/tcp --permanent
firewall-cmd --zone=public --add-port=1935/tcp --permanent
firewall-cmd --reload
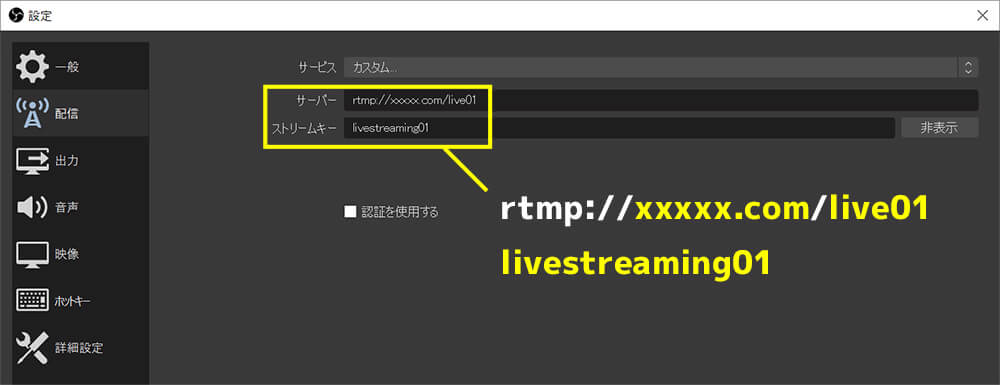
配信を開始する
今回のはRTMPに対応した配信クライアントのOBSを利用します。「xxxxx.com」はドメインもしくはサーバーのIPアドレスを入力します。
- [URL]rtmp://xxxxx.com/live01
(「live01」は「nginx.conf」で設定したRTMPの設定のアプリケーションと合わせます) - [ストリームキー]livestreaming01
(「livestreaming01」何でも良い)
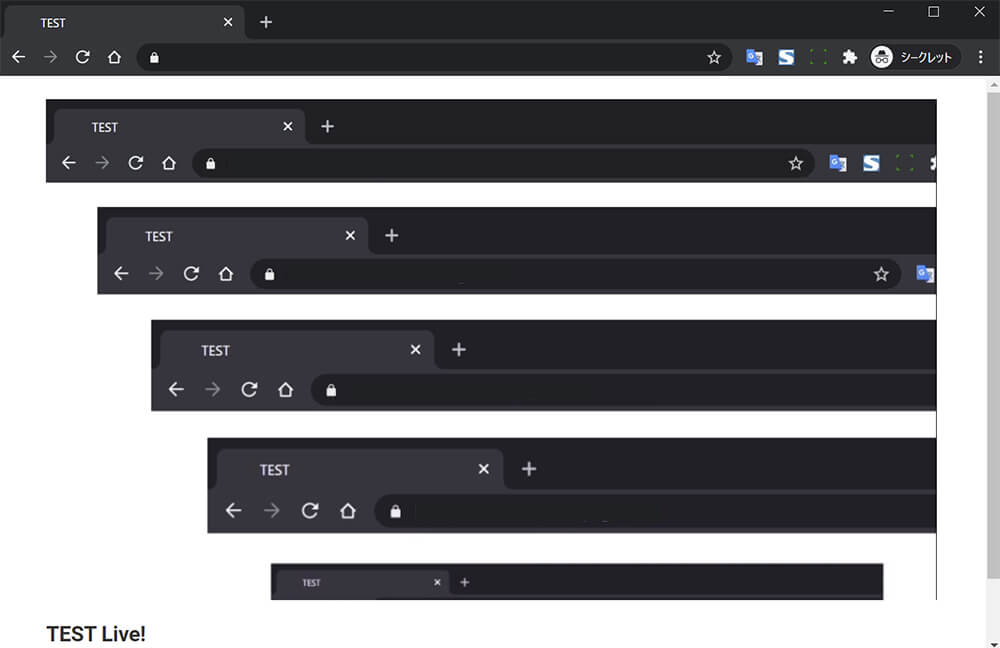
閲覧用のページを作成する
video.jsを使用して閲覧用のページ(HTML)を作成します。OBSの「URL」と「ストリームキー」を合わせます。
<link href="https://vjs.zencdn.net/6.6.3/video-js.css" rel="stylesheet">
<div>
    <video id="player" width="960" height="540" class="video-js vjs-default-skin" controls>
        <source src="http://xxxxx.com/livestreaming01.m3u8" type="application/x-mpegURL">
    </video>
</div>

<script src="https://vjs.zencdn.net/6.6.3/video.js"></script>
<script src="https://cdnjs.cloudflare.com/ajax/libs/videojs-contrib-hls/5.14.1/videojs-contrib-hls.js"></script>
<script>
    let player = videojs('player')
    player.play()
</script>
(結果)
参考にしたサイト
- nginxでストリーミングサーバを立ててライブ配信する。
https://qiita.com/hagane5563/items/842afe6d6e7100db3a28- nginx でストリーミングサーバを作る方法
https://kagasu.hatenablog.com/entry/2018/10/16/155836
SSL証明書取得
色々とインストールする前にSSLの証明書を取得した方が、後々失敗したときに楽だと思います。
Nginxのセットアップ
EPELリポジトリ有効化
sudo yum install epel-releaseNginxのバージョン確認
nginx -vサーバ再起動時に自動的にNginxを起動
systemctl enable nginxNginxを起動
systemctl start nginxNginxの動作確認
systemctl status nginxNginxサービスの状態が「active (running)」であれば正常に実行中です。
firewalldで外部との通信を許可
firewall-cmd --state「running」と表示されていればOKです。
ポート開放 http(80) https(443)
初期状態では「firewalld」(ファイアウォール)では「http(80)」と「https(443)」のポートは開放されていないので、「firewall-cmd」コマンドでポートの開放を行います。
firewall-cmd --permanent --add-service=http
firewall-cmd --permanent --add-service=https
firewall-cmd --reload
どれも「success」と表示されればOK。
ポートが開放状況を確認します。「services:」の部分に「http」「https」が表示されていれば問題ありません。
firewall-cmd --list-all(結果)
public (active)
target: default
icmp-block-inversion: no
interfaces: eth0
sources:
services: dhcpv6-client http https ssh
ports:
protocols:
masquerade: no
forward-ports:
source-ports:
icmp-blocks:
rich rules:
certbot-autoのセットアップと証明書の自動生成
最新版のcertbot-auto を取得。
curl https://dl.eff.org/certbot-auto -o /usr/bin/certbot-auto
chmod 700 /usr/bin/certbot-auto
証明書を自動生成します。Nginxのデフォルトのドキュメント・ルートは「/usr/local/nginx/html」を指定していますが、任意の場所に変更できます。また「-d」のドメイン名、「–email」は、みなさんの環境にあわせて書き換えをしてください。
certbot-auto certonly \
--webroot \
-w /usr/local/nginx/html \
-d xxxxx.com \
--email xxx@xxxxx.com
このコマンドを実行したら、パッケージのセットアップが始まりますので、画面の内容を確認の上、下記にように進みます。
(省略)
Is this ok [y/d/N]: y ← 入力
(省略)
(A)gree/(C)ancel: A ← 入力
(省略)
(Y)es/(N)o: Y ← 入力
下記のような画面が表示されれば処理完了です。
(省略)
IMPORTANT NOTES:
- Congratulations! Your certificate and chain have been saved at
  /etc/letsencrypt/live/xxxxx.com/fullchain.pem. Your cert will
  expire on 2016-10-09. To obtain a new or tweaked version of this
  certificate in the future, simply run certbot-auto again. To
  non-interactively renew *all* of your certificates, run
  "certbot-auto renew"
- If you lose your account credentials, you can recover through
  e-mails sent to xxx@xxxxx.com.
- Your account credentials have been saved in your Certbot
  configuration directory at /etc/letsencrypt. You should make a
  secure backup of this folder now. This configuration directory will
  also contain certificates and private keys obtained by Certbot so
  making regular backups of this folder is ideal.
- If you like Certbot, please consider supporting our work by:

  Donating to ISRG / Let's Encrypt:   https://letsencrypt.org/donate
  Donating to EFF:                    https://eff.org/donate-le
ホスト名の階層以下で、次のような証明書や秘密鍵などのファイルを確認(この例ではホスト名が「xxxxx.com」)します。
ls -l /etc/letsencrypt/live/xxxxx.com/(結果)
total 0
lrwxrwxrwx 1 root root 37 Jul 11 18:40 cert.pem -> ../../archive/xxxxx.com/cert1.pem
lrwxrwxrwx 1 root root 38 Jul 11 18:40 chain.pem -> ../../archive/xxxxx.com/chain1.pem
lrwxrwxrwx 1 root root 42 Jul 11 18:40 fullchain.pem -> ../../archive/xxxxx.com/fullchain1.pem
lrwxrwxrwx 1 root root 40 Jul 11 18:40 privkey.pem -> ../../archive/xxxxx.com/privkey1.pem
NginxのSSL 対応設定
Nginxで生成した証明書を読み込む設定をします。「/etc/nginx/nginx.conf」ファイルを開き、下記のように内容を追記します。証明書(ssl_sertificate)と秘密鍵(ssl_certificate_key)のパスは、みなさんの環境にあわせて書き換えをしてください。
誤りがあるかもしれませんが、SSL用のserverの記述にもPHPを動かすコードなども必要になってきますので、httpのserverのところと同じ内容を入れています。
vi /etc/nginx/nginx.confserver {
listen 443 ssl;
server_name xxxxx.com;
ssl_certificate /etc/letsencrypt/live/xxxxx.com/cert.pem;
ssl_certificate_key /etc/letsencrypt/live/xxxxx.com/privkey.pem;
root /usr/local/nginx/html;
index index.php;
charset utf-8;
client_max_body_size 100m;
access_log /var/log/nginx/ssl-access.log main;
# wordpress パーマネントリンク設定
try_files $uri $uri/ /index.php?q=$uri&$args;
location / {
root html;
index index.php index.html index.htm;
}
# wp-adminのBasic認証
location /wp-admin/ {
auth_basic "Basic Authentication";
auth_basic_user_file /etc/nginx;
}
# wp-config.php、wp-cron.phpのアクセス制限
location ~ ^(wp-config\.php|wp-cron\.php) {
deny all;
}
# xmlrpc.phpのアクセス制限
location /xmlrpc {
rewrite ^/xmlrpc\.php$ /"http\:\/\/0\.0\.0\.0\/" redirect;
}
#error_page 404 /404.html;
# redirect server error pages to the static page /50x.html
#
error_page 500 502 503 504 /50x.html;
location = /50x.html {
root html;
}
# pass the PHP scripts to FastCGI server listening on 127.0.0.1:9000
#
location ~ \.php$ {
root html;
fastcgi_pass unix:/var/run/php-fpm/php-fpm.sock;
fastcgi_index index.php;
fastcgi_param SCRIPT_FILENAME $document_root$fastcgi_script_name;
fastcgi_param PATH_INFO $fastcgi_script_name;
include fastcgi_params;
}
}
Nginxを再起動します。
systemctl reload nginx下記のようなエラーが出た場合、
Job for nginx.service failed because the control process exited with error code.
See "systemctl status nginx.service" and "journalctl -xe" for details.
「/etc/nginx/nginx.conf」ファイルの下記のコメントアウトを外してください。
http {
# log_format  main  '$remote_addr - $remote_user [$time_local] "$request" '
#                  '$status $body_bytes_sent "$http_referer" '
#                  '"$http_user_agent" "$http_x_forwarded_for"';
}

    ↓

http {
    log_format  main  '$remote_addr - $remote_user [$time_local] "$request" '
                        '$status $body_bytes_sent "$http_referer" '
                        '"$http_user_agent" "$http_x_forwarded_for"';
}
エラーを治した場合は、もう一度Nginxを再起動します。
systemctl reload nginxHTTPSへの強制リダイレクト
「http://」へのアクセスを「https://」にリダイレクトする設定をします。「/etc/nginx/nginx.conf」を開き、「server_name」の明示と、「return 301」の命令を追加します。リダイレクト先の URLはみなさんの環境にあわせてください。
vi /etc/nginx/nginx.confserver {
listen 80 default_server;
listen [::]:80 default_server;
server_name xxxxx.com;
return 301 https://xxxxx.com$request_uri;
}
Nginxを再起動。
systemctl reload nginx動作確認。
curl -v http://xxxxx.com(結果)
* About to connect() to xxxxx.com port 80 (#0)
*   Trying 133.242.68.208...
* Connected to xxxxx.com (133.242.68.208) port 80 (#0)
> GET / HTTP/1.1
> User-Agent: curl/7.29.0
> Host: xxxxx.com
> Accept: */*
>
< HTTP/1.1 301 Moved Permanently
< Server: nginx/1.6.3
< Date: Mon, 11 Jul 2016 10:02:38 GMT
< Content-Type: text/html
< Content-Length: 184
< Connection: keep-alive
< Location: https://xxxxx.com/
<
<html>
<head><title>301 Moved Permanently</title></head>
<body bgcolor="white">
<center><h1>301 Moved Permanently</h1></center>
<hr><center>nginx/1.6.3</center>
</body>
</html>
* Connection #0 to host xxxxx.com left intact
証明書の自動更新設定
Let’s Encryptの証明書は有効期限が3ヶ月で、定期的な更新作業が必要になります。「crontab -e」コマンドを実行して、cronに以下の内容を登録します。
crontab -e次の行を追加します。
50 3 * * 0 certbot-auto renew --post-hook "systemctl restart nginx" 1 > /dev/null 2 > /dev/nullこの設定を済ませておけば、自動的に更新されます。Let’s Encrypt証明書の有効期限が残り1ヶ月になれば、自動的に更新できるようになります。「–post-hook」オプションがあるのは、処理成功後にSSLの入れ替えをするため、Nginxの再起動を自動的に行います。
これは毎週日曜日3時50分に実行しています。
有効期限の確認と自動更新
opensslコマンドを使い証明書の有効期限を確認してみます。ドメイン名は環境に合わせてください。
openssl x509 -in /etc/letsencrypt/live/xxxxx.com/cert.pem -noout -dates(結果)
notBefore=Jul 11 08:40:00 2016 GMT
notAfter=Oct  9 08:40:00 2016 GMT
「notBefore」は証明書の生成日時、「notAfter」は証明書の有効期限です。
更新日が切り替わるかの確認のため、強制的に更新を行ってみます。「–force-renew」オプションを実行します。
certbot-auto renew --force-renew --post-hook "systemctl restart nginx"(結果)
-------------------------------------------------------------------------------
Processing /etc/letsencrypt/renewal/xxxxx.com.conf
-------------------------------------------------------------------------------

-------------------------------------------------------------------------------
new certificate deployed without reload, fullchain is
/etc/letsencrypt/live/xxxxx.com/fullchain.pem
-------------------------------------------------------------------------------

Congratulations, all renewals succeeded. The following certs have been renewed:
    /etc/letsencrypt/live/xxxxx.com/fullchain.pem (success)
再び有効期限を確認します。先ほどより期限が延びていればOKです。ドメイン名は環境に合わせてください。
openssl x509 -in /etc/letsencrypt/live/xxxxx.com/cert.pem -noout -dates(結果)
notBefore=Jul 11 08:54:00 2016 GMT
notAfter=Oct  9 08:54:00 2016 GMT
証明書のパスも確認します。それぞれローテートされ、シンボリック・リンク先が「ファイル名1.pem」から「ファイル名2.pem」に変わっていればOKです。ドメイン名は環境に合わせてください。
ls -l /etc/letsencrypt/live/xxxxx.com/(結果)
total 0
lrwxrwxrwx 1 root root 37 Jul 11 18:53 cert.pem -> ../../archive/xxxxx.com/cert2.pem
lrwxrwxrwx 1 root root 38 Jul 11 18:53 chain.pem -> ../../archive/xxxxx.com/chain2.pem
lrwxrwxrwx 1 root root 42 Jul 11 18:53 fullchain.pem -> ../../archive/xxxxx.com/fullchain2.pem
lrwxrwxrwx 1 root root 40 Jul 11 18:53 privkey.pem -> ../../archive/xxxxx.com/privkey2.pem
設定に失敗した時
何回か失敗すると4~5日ぐらい経ってからでないと、エラーがでますので、時間をおいて再チェレンジしてください。
参考にしたサイト
- Let’s EncryptのSSL証明書で、安全なウェブサイトを公開
https://knowledge.sakura.ad.jp/5573/
phpインストール前の事前準備
php5.4系のインストール確認
yum list installed | grep php削除
yum remove php*epelリポジトリの追加
epelリポジトリはインストール済みです。インストールするアプリがCentOS標準のリポジトリのアプリと混合しないように、「–enablerepo」で指定しなければ「epel」リポジトリを使用出来ない設定にします。
vi /etc/yum.repos.d/epel.repo設定内容
下記項目の「enabled=1」部分を「enabled=0」に変更。
- [epel]
- [epel-debuginfo]
- [epel-source]
remiリポジトリの追加
remiリポジトリを「rpm」コマンドを使用してインストール。
rpm --import http://rpms.famillecollet.com/RPM-GPG-KEY-remi
rpm -ivh http://rpms.famillecollet.com/enterprise/remi-release-7.rpm
これで「php 7.4」をインストールするために必要なリポジトリの設定ファイル「remi-php74.repo」が「/etc/yum.repos.d」ディレクトリに作成されます。
「remi」リポジトリは、初期設定で「enable=0」に設定されていて「–enablerepo」で指定しなければ「remi」リポジトリ各種を使用出来ない設定になっているはずです。
php7.4
php7.4はCentOS7のベースリポジトリには無いので、「remi-php74」リポジトリを使用してインストールしていきます。
php7.4インストール
「php7.4」の他にも必要な「php-fpm」も一緒にインストールします。
yum install --enablerepo=epel,remi-php74 php php-mbstring php-pear php-fpm php-mcrypt php-mysqlphpバージョン確認
php -v(結果)
PHP 7.4.11 (cli) (built: Sep 29 2020 10:17:06) ( NTS )
Copyright (c) The PHP Group
Zend Engine v3.4.0, Copyright (c) Zend Technologies
上記のような表示が出ていればOKです。
php.iniの変更
phpのセキュリティ設定
phpのバージョンは公開しないほうが良いので、バージョンを非表示にする設定をします。
374行目
expose_php = On
    ↓
expose_php = Off
に変更。
アップロードサイズの変更
POST データの最大サイズを設定するpost_max_sizeをデフォルトでは8Mですが、20Mに変更。
672行目
post_max_size = 8M
    ↓
post_max_size = 20M
に変更。
併せてupload_max_filesizeも変更します。
upload_max_filesize = 2M
    ↓
upload_max_filesize = 20M
に変更。
タイムゾーンの設定
タイムゾーンの設定をしないとエラーが大量に出力されます。日本の場合は”Asia/Tokyo”です。
902行目
;date.timezone =
    ↓
date.timezone = "Asia/Tokyo"
に変更。
マルチバイト対応(日本語対応)設定
日本語を利用するうえでの設定変更です。まずはmbstringで使用される言語のデフォルト値を定義するmbstring.languageを設定します。
1509行目
;mbstring.language = Japanese
    ↓
mbstring.language = Japanese
に変更。
続いて内部文字エンコーディングのデフォルト値を定義するmbstring.internal_encodingはOSに合わせてUTF-8を指定します。
1516行目
;mbstring.internal_encoding =
    ↓
mbstring.internal_encoding = UTF-8
に変更。
HTTP通信の時のインプット文字コードを指定するmbstring.http_inputは、UTF-8を指定しています。
1524行目
;mbstring.http_input =
    ↓
mbstring.http_input = UTF-8
に変更。
HTTP出力文字コードを指定するmbstring.http_outputはpassを指定して自動変換を行わないようにします。
1534行目
;mbstring.http_output =
    ↓
mbstring.http_output = pass
に変更。
HTTP入力変換を有効にするmbstring.encoding_translationをOnにします。文字化けが発生した場合はOffにします。
1542行目
;mbstring.encoding_translation = Off
    ↓
mbstring.encoding_translation = On
に変更。
文字コード自動検出の優先順位を定義するパラメーターであるmbstring.detect_orderを設定します。autoの場合、UTF-8が最初に選択されるため、autoのままにします。
1547行目
;mbstring.detect_order = auto
    ↓
mbstring.detect_order = auto
に変更。
コードとして変換できない文字がある場合に、代替の文字を出力しないようmbstring.substitute_characterを設定します。
1552行目
;mbstring.substitute_character = none
    ↓
mbstring.substitute_character = none
に変更。
以上でphp.iniの設定変更は完了です。
php-fpm
「php-fpm」のインストールは「php7.4」のインストール時に一緒に行っていますので、ここではインストールしません。
php-fpmの設定
php-fpmの実行ユーザーとグループは初期設定は「apache」となっているので、「nginx」と連携させるために「/etc/php-fpm.d/www.conf」を編集して、実行ユーザーとグループを「nginx」に変更します。
www.confの設定
cd /etc/php-fpm.d/
cp -p www.conf www.conf_yyyymmdd
vi www.conf
変更内容
実行ユーザー・グループをnginxに変更します。
user = apache
    ↓
user = nginx
group = apache
    ↓
group = nginx
念のためコメントアウトは残して項目を追加します。
; Note: This value is mandatory.
;listen = 127.0.0.1:9000
listen = /var/run/php-fpm/php-fpm.sock

;listen.owner = nobody
;listen.group = nobody
;listen.mode = 0660
listen.owner = nginx
listen.group = nginx
listen.mode = 0660
パラメーターの変更
デフォルトでの設定だとメモリを多く使い過ぎてしまうことがありますので、数値をやや低めに設定しておきます。サーバーのスペックやHTTPのリクエスト数に応じて設定を変更する必要がありますので、あくまでも参考程度に。
pm.max_children
処理を行う子プロセスの最大数。
;pm.max_children = 50
    ↓
pm.max_children = 25
pm.start_servers
php-fpmのサービス開始時に起動される子プロセスの数。
; The number of child processes created on startup.
; Note: Used only when pm is set to 'dynamic'
; Default Value: min_spare_servers + (max_spare_servers - min_spare_servers) / 2
;pm.start_servers = 5
    ↓
pm.min_spare_servers = 10
pm.min_spare_serverss
待ち状態にあるphp-fpm子プロセスの最小の数値。
; The desired minimum number of idle server processes.
; Note: Used only when pm is set to 'dynamic'
; Note: Mandatory when pm is set to 'dynamic'
;pm.min_spare_servers = 5
    ↓
pm.min_spare_servers = 10
pm.max_spare_servers
待ち状態にあるphp-fpm子プロセスの最大の数値。
; The desired maximum number of idle server processes.
; Note: Used only when pm is set to 'dynamic'
; Note: Mandatory when pm is set to 'dynamic'
;pm.max_spare_servers = 35
    ↓
pm.max_spare_servers = 20
pm.max_requests
子プロセスが再起動するまでに実行するリクエスト数。
; The number of requests each child process should execute before respawning.
; This can be useful to work around memory leaks in 3rd party libraries. For
; endless request processing specify '0'. Equivalent to PHP_FCGI_MAX_REQUESTS.
; Default Value: 0
;pm.max_requests = 500
    ↓
pm.max_requests = 500
これでphp-fpmの設定ファイル変更は完了です。
php-fpm起動
systemctl start php-fpmphp-fpmのstatusを確認
systemctl status php-fpmphp-fpm自動起動設定
systemctl enable php-fpmNginxの設定を変更
Nginxの設定を変更してPHPを実行できるようにするために、nginx.confを編集します。後でインストールするWordPress用の設定もしてあります。
vi /etc/nginx/nginx.confuser nginx;
worker_processes auto;
#error_log logs/error.log;
#error_log logs/error.log notice;
#error_log logs/error.log info;
#pid logs/nginx.pid;
events {
worker_connections 1024;
}
http {
include mime.types;
default_type application/octet-stream;
log_format main '$remote_addr - $remote_user [$time_local] "$request" '
'$status $body_bytes_sent "$http_referer" '
'"$http_user_agent" "$http_x_forwarded_for"';
#access_log logs/access.log main;
sendfile on;
#tcp_nopush on;
#keepalive_timeout 0;
keepalive_timeout 65;
#gzip on;
server {
listen 80 default_server;
listen [::]:80 default_server;
server_name xxxxx.com;
return 301 https://xxxxx.com$request_uri;
root /usr/local/nginx/html;
index index.php;
charset utf-8;
client_max_body_size 100m;
#access_log logs/host.access.log main;
error_log /var/log/nginx/error.log;
# wordpress パーマネントリンク設定
try_files $uri $uri/ /index.php?q=$uri&$args;
location / {
root html;
index index.php index.html index.htm;
}
# wp-config.php、wp-cron.phpのアクセス制限
location ~ ^(wp-config\.php|wp-cron\.php) {
deny all;
}
# xmlrpc.phpのアクセス制限
location /xmlrpc {
rewrite ^/xmlrpc\.php$ /"http\:\/\/0\.0\.0\.0\/" redirect;
}
#error_page 404 /404.html;
# redirect server error pages to the static page /50x.html
#
error_page 500 502 503 504 /50x.html;
location = /50x.html {
root html;
}
# proxy the PHP scripts to Apache listening on 127.0.0.1:80
#
#location ~ \.php$ {
# proxy_pass http://127.0.0.1;
#}
# pass the PHP scripts to FastCGI server listening on 127.0.0.1:9000
#
location ~ \.php$ {
root html;
fastcgi_pass unix:/var/run/php-fpm/php-fpm.sock;
fastcgi_index index.php;
fastcgi_param SCRIPT_FILENAME $document_root$fastcgi_script_name;
fastcgi_param PATH_INFO $fastcgi_script_name;
include fastcgi_params;
}
# deny access to .htaccess files, if Apache's document root
# concurs with nginx's one
#
#location ~ /\.ht {
# deny all;
#}
}
# another virtual host using mix of IP-, name-, and port-based configuration
#
#server {
# listen 8000;
# listen somename:8080;
# server_name somename alias another.alias;
# location / {
# root html;
# index index.html index.htm;
# }
#}
# HTTPS server
#
server {
listen 443 ssl;
server_name xxxxx.com;
ssl_certificate /etc/letsencrypt/live/xxxxx.com/cert.pem;
ssl_certificate_key /etc/letsencrypt/live/xxxxx.com/privkey.pem;
root /usr/local/nginx/html;
index index.php;
charset utf-8;
client_max_body_size 100m;
access_log /var/log/nginx/ssl-access.log main;
# wordpress パーマネントリンク設定
try_files $uri $uri/ /index.php?q=$uri&$args;
location / {
root html;
index index.php index.html index.htm;
}
# wp-config.php、wp-cron.phpのアクセス制限
location ~ ^(wp-config\.php|wp-cron\.php) {
deny all;
}
# xmlrpc.phpのアクセス制限
location /xmlrpc {
rewrite ^/xmlrpc\.php$ /"http\:\/\/0\.0\.0\.0\/" redirect;
}
#error_page 404 /404.html;
# redirect server error pages to the static page /50x.html
#
error_page 500 502 503 504 /50x.html;
location = /50x.html {
root html;
}
# pass the PHP scripts to FastCGI server listening on 127.0.0.1:9000
#
location ~ \.php$ {
root html;
fastcgi_pass unix:/var/run/php-fpm/php-fpm.sock;
fastcgi_index index.php;
fastcgi_param SCRIPT_FILENAME $document_root$fastcgi_script_name;
fastcgi_param PATH_INFO $fastcgi_script_name;
include fastcgi_params;
}
}
#server {
# listen 443 ssl;
# server_name localhost;
# ssl_certificate cert.pem;
# ssl_certificate_key cert.key;
# ssl_session_cache shared:SSL:1m;
# ssl_session_timeout 5m;
# ssl_ciphers HIGH:!aNULL:!MD5;
# ssl_prefer_server_ciphers on;
# location / {
# root html;
# index index.html index.htm;
# }
#}
}
rtmp {
server {
listen 1935;
chunk_size 4096;
access_log /var/log/nginx/rtmp_access.log;
application live01 {
live on;
wait_video on;
record off;
hls on;
hls_path /usr/local/nginx/html;
hls_fragment 5s;
}
}
}
Nginxを起動
service nginx start確認(phpinfoを表示)
今回はホームディレクトリ以下に/usr/local/nginx/htmlの中にあるindex.php(無ければ作る)を実行できるようにします。
vi /usr/local/nginx/html/index.phpindex.phpの中身は以下です。
<?php phpinfo(); ?>ブラウザでhttp://xxxxx.com(ドメイン名もしくはサーバーのIPアドレス)でアクセスしてphpinfoが表示されればOKです。
MariaDB
MariaDBインストール
yum install mariadb mariadb-serverMariaDB起動
systemctl start mariadbMariaDB自動設定
systemctl enable mariadbMariaDB設定
初期設定を行っていきます。「MariaDB」の「root」ユーザーパスワード設定や、最初から設定されている「anonymous」ユーザーや、「test」データベースなどを削除することが出来ます。
mysql_secure_installation(実行ログ)
/bin/mysql_secure_installation: line 379: find_mysql_client: command not found

NOTE: RUNNING ALL PARTS OF THIS SCRIPT IS RECOMMENDED FOR ALL MariaDB
        SERVERS IN PRODUCTION USE!  PLEASE READ EACH STEP CAREFULLY!

In order to log into MariaDB to secure it, we'll need the current
password for the root user.  If you've just installed MariaDB, and
you haven't set the root password yet, the password will be blank,
so you should just press enter here.

Enter current password for root (enter for none): ←「Enter」キーを押下
OK, successfully used password, moving on...

Setting the root password ensures that nobody can log into the MariaDB
root user without the proper authorisation.

Set root password? [Y/n] y ←「Enter」キーを押下
New password:           ← mariadbのrootユーザーパスワード設定
Re-enter new password: ← mariadbのrootユーザーパスワード設定
Password updated successfully!
Reloading privilege tables..
    ... Success!


By default, a MariaDB installation has an anonymous user, allowing anyone
to log into MariaDB without having to have a user account created for
them.  This is intended only for testing, and to make the installation
go a bit smoother.  You should remove them before moving into a
production environment.

Remove anonymous users? [Y/n] y ←「y」または「Enter」キーを押下
    ... Success!

Normally, root should only be allowed to connect from 'localhost'.  This
ensures that someone cannot guess at the root password from the network.

Disallow root login remotely? [Y/n] y ←「y」または「Enter」キーを押下

By default, MariaDB comes with a database named 'test' that anyone can
access.  This is also intended only for testing, and should be removed
before moving into a production environment.

Remove test database and access to it? [Y/n] y ←「y」または「Enter」キーを押下
    - Dropping test database...
    ... Success!
    - Removing privileges on test database...
    ... Success!

Reloading the privilege tables will ensure that all changes made so far
will take effect immediately.

Reload privilege tables now? [Y/n] y  ←「y」または「Enter」キーを押下

Cleaning up...

All done!  If you've completed all of the above steps, your MariaDB
installation should now be secure.

Thanks for using MariaDB!
文字コード設定
「/etc/my.cnf.d/server.cnf」で「wordpress」での文字化け対策として「utf-8」に設定します。
cd /etc/my.cnf.d/
cp -p server.cnf server.cnf_yyyymmdd
vi server.cnf
設定内容
[mysqld]
character-set-server = utf8  ← これを追加
MariaDB再起動
systemctl restart mariadbWordPressダウンロード
WordPressインストール用ディレクトリ作成
WordPressをインストールするためのディレクトリ「/usr/local/nginx/html」を作成します。ディレクトリは任意で変更できます。
mkdir -p /usr/local/nginx/html
chown nginx:nginx /usr/local/nginx/html
作成したディレクトリに移動し、最新版のWordPressをダウンロードしてきます。
cd /usr/local/nginx/html
curl -O https://ja.wordpress.org/latest-ja.tar.gz
ダウンロードしてきたファイルを解凍すると「wordpress」というフォルダが出てくるので、所有者とグループを「nginx」に設定します。
tar xzfv latest-ja.tar.gz
chown -R nginx:nginx wordpress
ここで私は「wordpress」の中身のファイルををFTPで「html」直下に移動させました。移動させない場合、この後の「wp-config.php」のところでパスの追加が必要かもしれません。
wordpress用設定
「MariaDB」の初期設定が完了したら、今度は「wordpress」用のデータベースと、データベース管理ユーザーを作成します。今回は「phpMyAdmin」を使用しないで、SQLコマンドで作成します。
wordpress用データベース作成
「mysql_secure_installation」で設定したrootユーザーで「MariaDB」に接続し、「CREATE DATABASE」コマンドで「wordpress」で使用するデータベースを作成します。
「xxxxx_db」はデータベース名です。みなさんの環境に合わせてください。
CREATE DATABASE xxxxx_db;実行ログ
mysql -u root -p
Enter password:

MariaDB [(none)]> CREATE DATABASE xxxxx_db;
Query OK, 1 row affected (0.00 sec)
データベース管理ユーザー作成
次に作成したデータベースの、管理ユーザーを作成します。パスワードはmariadbのrootユーザーパスワードです。
GRANT ALL PRIVILEGES ON xxxxx_db.* TO "管理ユーザー"@"localhost" IDENTIFIED BY "パスワード";(結果)
Query OK, 0 rows affected (0.00 sec)「FLUSH PRIVILEGES」コマンドで作成したユーザー情報を反映させます。
FLUSH PRIVILEGES;(結果)
Query OK, 0 rows affected (0.00 sec)管理ユーザーの作成と設定反映が終わったら、「exit」と入力して作業を終わります。
exit(結果)
ByeWordPress
最後に「wordpress」の設定を行います。
「wordpress」のデータは「nginx」の設定を行った際に、すでにダウンロードし解凍してあるので、そのフォルダに移動し作業を行います。
cd /usr/local/nginx/html※移動するディレクトリは、適宜皆さんの環境に合わせて読み替えてください。
wp-config設定
フォルダの中に、「wordpress」の設定ファイルのサンプルである「wp-config-sample.php」をコピーして「wp-config.php」を作成し、設定を行います。
cp -p wp-config-sample.php wp-config.php
vi wp-config.php
設定内容
基本的に設定する項目は以下の通りとなります。
wordpress用データベース名
wordpress用に作成したデータベース名を入力。
define('DB_NAME', 'xxxxx_db');データベースのユーザー名
wordpress用に作成したデータベースの管理ユーザー名を入力。
define('DB_USER', '管理ユーザー名');データベース管理ユーザーのパスワード
wordpress用に作成したデータベース管理ユーザーのパスワードを入力。
define('DB_PASSWORD', 'パスワード');WordPressの初期設定
最後にインストールした「wordpress」にwebブラウザからアクセスして、blogのタイトルやユーザーの作成など初期設定を行います。
初期設定を行うためのURLは下記になります。「xxxxx.com」はホスト名もしくはサーバーのIPアドレスになります。
- https://xxxxx.com/wp-admin/install.php
以上で、作業完了です。
参考にしたサイト
- CentOS7 + php7.2 + nginx + MariaDB + wordpressインストール
https://www.server-memo.net/memo/wordpress/nginx-install.html- CentOS 7のNginx環境にPHP7をインストールして最短で開発環境を構築
https://www.rem-system.com/centos-nginx-php
最後に
SSH接続でrootでのログインは攻撃されやすく危険なようですので、必要であれば作業用のユーザーを作って作業をしてください。
参考になるサイト
- 最初の設定!一般ユーザの作成とsshによるroot接続の禁止等
https://www.bnote.net/centos/initial_settings01.html
お疲れ様でした!